The "Preferences" dialog allows you to set user preferences and system options and is organized along several pages which can be selected by clicking the corresponding tab sheet:
| Set Factory Defaults |
Click this button to reset all customizations to the factory defaults. Please note that the original Epina ImageLab icon will be display only after restarting Epina ImageLab.
|
| Load/Save Customized Setup |
The current customization parameters can be stored and loaded in/from a file. This command allows you to create different set-ups changing conveniently between them. Further the stored customization parameters can be used as a basis for OEM customizations - if you are an OEM and want to deliver Epina ImageLab with your instrument in a customized form, please contact us for details at office@epina.at. |
| Application Title |
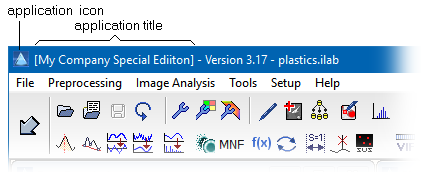 The application title is the text in the caption of the application window (by default it is "ImageLab") followed by the version number of the program and the file name of the currently loaded data. The application title is also displayed in the about box. The application title is the text in the caption of the application window (by default it is "ImageLab") followed by the version number of the program and the file name of the currently loaded data. The application title is also displayed in the about box. |
| Application Icon |
The application icon controll both the icon at the top left of the application and the icon in the Windows task bar. Please note that the icon file (*.ico) has to be stored in the home directory of Epina ImageLab (the folder where the Epina ImageLab executable is stored). The icon filename must not contain any file path (just the file name including the file extension, for example, 'myicon.ico'). The icon should have a minimum resolution of 32x32 pixels with 256 colors.
|
| Color 1 & 2 of the Shortcut Bar |
 The colors of the background of the shortcut button bar can adjusted. The following example shows the bar using skyblue as color 1 and white as color 2: The colors of the background of the shortcut button bar can adjusted. The following example shows the bar using skyblue as color 1 and white as color 2: |
| Show Disabled Buttons |
Displays all buttons, even those which are deactivated due to license restrictions. |
 |
| Color Gradient |
Determines the kind of color gradient used for the background of the shortcut button bar. Nine different gradient forms are available. |
| Epina ImageLab allows you to adjust the background of the main window. This is achieved by painting four layers on top of each other: the bottom layer is the monochrome desktop background, followed by the bottom background image (which is always stretched and aligned to the entire background), then the top background image (which is drawn without any size adjustments in the center of the background), and finally an optional rectangular grid. |
| Background Color of the Desktop |
Specifies the background color of the desktop. This color is only visible if there is no bottom background image defined. |
| Bottom BG Image |
The filename of the bottom background image. It is always stretched and aligned to the desktop. An empty entry makes this image invisible. |
| Top BG Image |
The filename of the top background image. This image is always draw in the center of the desktop without any size adjustments. An empty entry makes this image invisible. |
| Display BG Grid / Grid Color |
If this option is active a regular grid using the specified color is drawn on top of all the background images. |
| Top and Bottom Color of the About Background |
These two colors control the color gradient of the background of the About box. Please note that the bottom color should always be a dark color in order to ensure the visibility of the links at the bottom (see below). |
| Final Remarks in the About Box |
Here you can enter an arbitrary text, which can be split into two lines by the separating characters "\n". The text in the image at the bottom right is created by the string "A product of Epina GmbH\nwww.epina.at".
|
|
The About Box provides the capability of linking to the homepage of the product or to a specific mail address. This link is displayed at the bottom of the About Box. The URL supports both the http protocol and the mailto protocol. Two links can be defined. You can make a particular link invisible by clearing the text field of the URL.
|
| Link 1 in the About Box |
Link 1 is the upper of the two links. |
 |
| Link 2 in the About Box |
Link 2 is the lower of the two links. |
| Suppress Automatic Check for Updates |
This option determines whether the result of the update checking process is displayed during startup. |
 Setup
Setup 


 Setup > Preferences [Tab "Customization"]