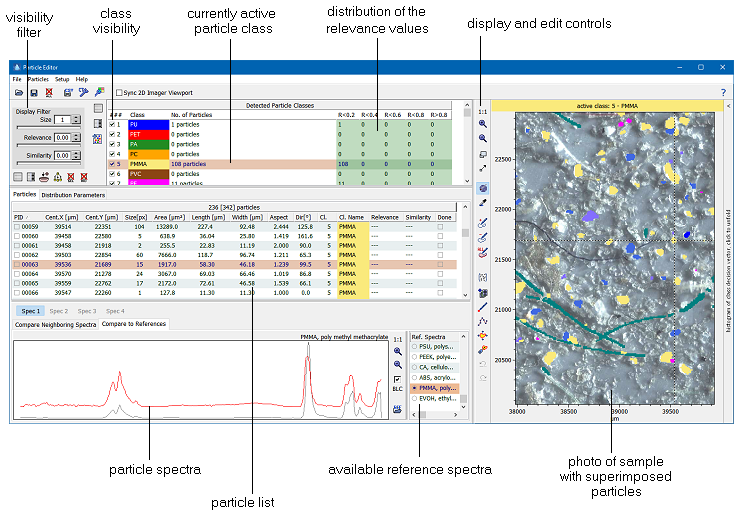
Particle Editor

Command: Editors > Particle Editor

The particle editor serves to edit particles detected in an image (see the overview on particle detection for background information on how to identify particles in an image). The particle editor displays the found particles, allows to filter them and to edit particle areas.

The particle editor provides the following areas:
List of Particle Classes The list of particle classes provides an overview of the found particles itemized by the various particle classes. Depending on the method used for the detection of the particles, several classes can be created during particle detection. Please note that you can edit the names of the particle classes by clicking the corresponing class names twice and entering the intended name (provided that the option "Allow Editing of Class Names in Particle Editor" in the preferences is activated).
Visibility Filter The visibility filter allows to restrict the list of displayed particles (both in the particle list and the image). You can set the mininum required size (in pixels), the relevance and the similarity to reference spectra.
Particle List The particle list contains the parameters of all found particles. The following list shows the standard parameters which are available for each particle:
PID The particle identifier, which is an integer number unique to each particle.
CenterX, CenterY The x and y coordinates of the center of the particle.
Size The size of the particle (= number of pixels which belong to this particle)
Area The area of the particle in scaled square units. Please note that the area is calculated from the pixel size of a particle and will differ only if the lateral axes of the image has been calibrated.
Length, Width The length and the width of the particle
Aspect The ratio of length and width.
Dir The direction of the longest axis of the particle in degrees (0...180°, counterclockwise). Zero degrees is horizontal, 90 degrees is vertical
Class Number The class number of the particle.
Class Name The name of the particle class.
Relevance The relevance of classification; this value is used in connection with classifiers and is zero if not calculated.
Similarity The similarity of the particle spectrum to the corresponding reference spectrum. The similarity is only listed if a reference spectrum can be assigned.
Done Each particle can be tagged by ticking the checkbox in the column "Done". These tags can be used to organize the (manual) post-processing of particles. Please note that the visibility of the "Done" tags can be controlled by clicking the tag button .
Further you can define additional parameters which can be used for entering additional information (see particle categories for details).

The particle list can be processed either by clicking one of the buttons at the top left of the particle list or by using one of the following commands (activate the check boxes at the left to select a particle for further processing):
File > Load Particle Collection Load a stored particle list.
File > Save the Current Particle Collection Save the current particle list.
File > Export Particle Data as CSV File Export the particle list as a CSV file.
Setup > Particle Categories Setup the particle categories.
File > Clear the Particle Collection Delete all particles.
  File > Create Particle Mask Creates a pixel mask which covers the currently visible particles.
  Particles > Export Mean Spectra of Selected Particles .
Particles > Clear the Particle Collection Deselect all particles.
Particles > Invert Selection Invert the particle selection.
Setup > Add a New Class Add an additional particle class to the current list of classes.
Particles > Add Particle Spectra to Spectral Collection Add the spectra of the selected particles to the spectral collection. After clicking this button you have to select which spectra to add to the collection.
Particles > Copy Particle Spectra to Dataset Editor Copies the spectra of the selected partcles to the training/test dataset. Please note that this command overwrites all existing entries in the dataset editor. Hint: If the dataset editor was not already open, it will be opened without any selected spectral descriptors. In order to see a background image in the dataset editor you have to load suitable spectral descriptors.
Particles > Delete Selected Particles Delete the selected particles.

Particle Spectra There are two forms how particle spectra are displayed: (1) all spectra of a selected particle and all non-particle spectra along the edge of the selected particle drawn on top of each other; (2) the spectrum of the center of the particle compared to a reference spectrum of the same class of particles (this feature is only available, if you have a set of reference spectra installed and if the classification process during particle detection assigned unique class IDs. See the section on particle spectra for more.
Particle Viewer The found particles are displayed on top of the photo of the sample (if available and calibrated) or on top of an artificial sample "photo". The colors of the displayed particles correspond to the class colors displayed in the particle list.

The particle viewer toolbar contains the following buttons:

Adjust the zoom factor to display the entire image.1)
Zoom in on the image.1)
Zoom out of the image.1)
Zoom into the image by drawing a rectangular area which is enlarged to fill the data window after releasing the mouse button.1)
Pan the image by dragging it with the mouse.1)
Select a particle and display its spectrum.
Select the active class. This tool allows to select the active class by clicking the corresponding pixel. Please note that only a visible class can be made an active one.
Add pixels by drawing a lasso line around the area to be added. If the lasso line does not intersect with other particles a new particle is created, otherwise the pixels within the lasso line are added to the intersecting particle.
Remove all pixels of the active class within a region defined by a lasso line.
Remove all pixels of all classes within a region defined by a lasso line. Please note that even pixels of unvisible classes are removed by this command.
Temporarily hide the particles and show only the photo below the particles.
Add the current image to the image stack
This tool allows you to set or reset individual pixels simply by clicking them.
Opens the path measurement and editing tool. After closing this tool the specified pathes are added as particles to the image.
Enlarge the selected particle by adding a one-pixel margin around the pixel. Please note that the additional edge is also added to internal edges (in the case of holes in the particle).
Toggles the visibility of particle "Done" tags. Clicking this button toggles between three states: (1) particle states are not visible at all, (2) particles having tags are indicated by squares in their centers, (3) the particle tags include the particle ID as well.
 
Undo/Redo: The particle editor remembers the last five changes, enabling you to undo or redo recent changes.

Hint: The particles which are currently loaded in the particle editor can be accessed programmatically by using the pre-declared global variable PEData.


1) Please note that you can tie the particle display and the viewport of the 2D Imager by activating the checkbox "Sync 2D Imager Viewport" in the top toolbar of the particle editor. If this option is enabled the two displays show the same viewport of the image (as far as possible).