|
| Command: |
File > Import Data > ENVI Data File |
The command File>Import Data>ENVI Data File allows to import any kind of data encoded in the ENVI data format. After selecting the header file of the ENVI dataset the window shows the most important parameters of the file. Depending on the sensor type the spectral type either is automatically set to the corresponding entry, or is set to "undefined". In this case the user has to select from the list of supported spectral types.

| How To: |
- Click the command File>Import Data>ENVI Data File
- Click the button "Select Data File" and select the header file (file extension .hdr) of the dataset to be imported.
- If required, select the appropriate spectral type.
- Some instruments provide images which use a coordinate system whose origin is at the top left corner of the image. Tick off the checkbox "Mirror Y Axis" in order to switch to an origin at the bottom left corner.
- Optionally, enter a sample name and/or edit the sample description which has been taken from the ENVI header file.
- Optionally, adjust the pixel sizes
- Click the "Import Data" button
|
Please note that there are several instruments on the market which create a binary header stored directly in the data file instead of a standard ENVI text header. In order to cope with such situations Epina ImageLab provides the possibility to read the data file and to set the header information manually. If you select an ENVI encoded datafile and Epina ImageLab cannot find the corresponding header file Epina ImageLab displays the ENVI header dialog where you can set the header parameters which suit your dataset.
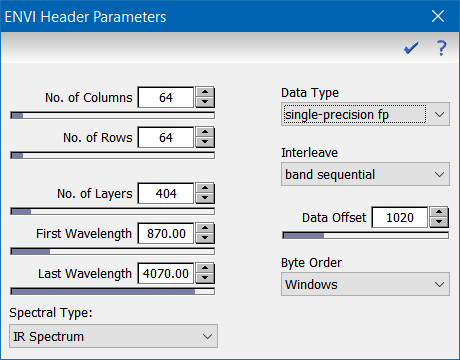
This dialog is rather technical and should be used with care. Wrong parameters will lead to corrupted data. The following tables lists the header parameters:
| Parameter |
Explanation |
| No. of Columns |
the number of horizontal pixels |
| No. of Rows |
the number of vertical pixels |
| No. of Layers |
the number of spectral data points |
| First Wavelength |
the wavelength (wave number, mass, ...) of the first spectral data point |
| Last Wavelength |
the wavelength (wave number, mass, ...) of the last spectral data point |
| Spectral Type |
the type of the spectrum |
| Data Type |
the numerical format which is used for storing the data |
| Interleave |
the order of the data |
| Data Offset |
the (byte) offset where the data section starts in the data file |
| Byte Order |
the order of the bytes of multibyte formats |
In order to import ENVI data without a standard header file, you have to perform the following steps:
| How To: |
- Click the command File>Import Data>ENVI Data File
- Click the button "Select Data File" and select the file (file extension .dat in most cases) to be imported. Epina ImageLab will automatically check whether there is an appropriate header file available. If not, it will display the ENVI header dialog.
- Enter the required parameters according to the table above.
- Click the OK button to close the ENVI header dialog
- Some instruments provide images which use a coordinate system whose origin is at the top left corner of the image. Tick off the checkbox "Mirror Y Axis" in order to switch to an origin at the bottom left corner.
- Optionally, enter a sample name and/or edit the sample description which has been taken from the ENVI header file.
- Click the "Import Data" button
|
|
 File Operations

